StageDAW follows Logic Pro by listening to its MIDI timecode, and moves Logic’s playhead itself through macOS Accessibility. The setup below is done once and applies to every Project.
Requires Logic Pro 11 or newer, on macOS.
Turn on Accessibility permission.
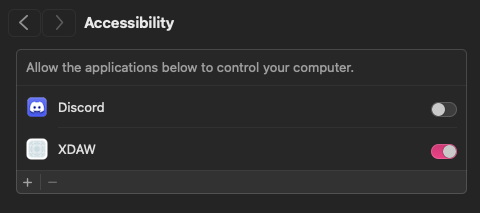
Open System Settings ▸ Privacy & Security ▸ Accessibility and turn on StageDAW. If it is already listed, turn it off and on again. This is what lets StageDAW read Logic’s Marker List and move its playhead.
Set Logic to transmit MIDI timecode.
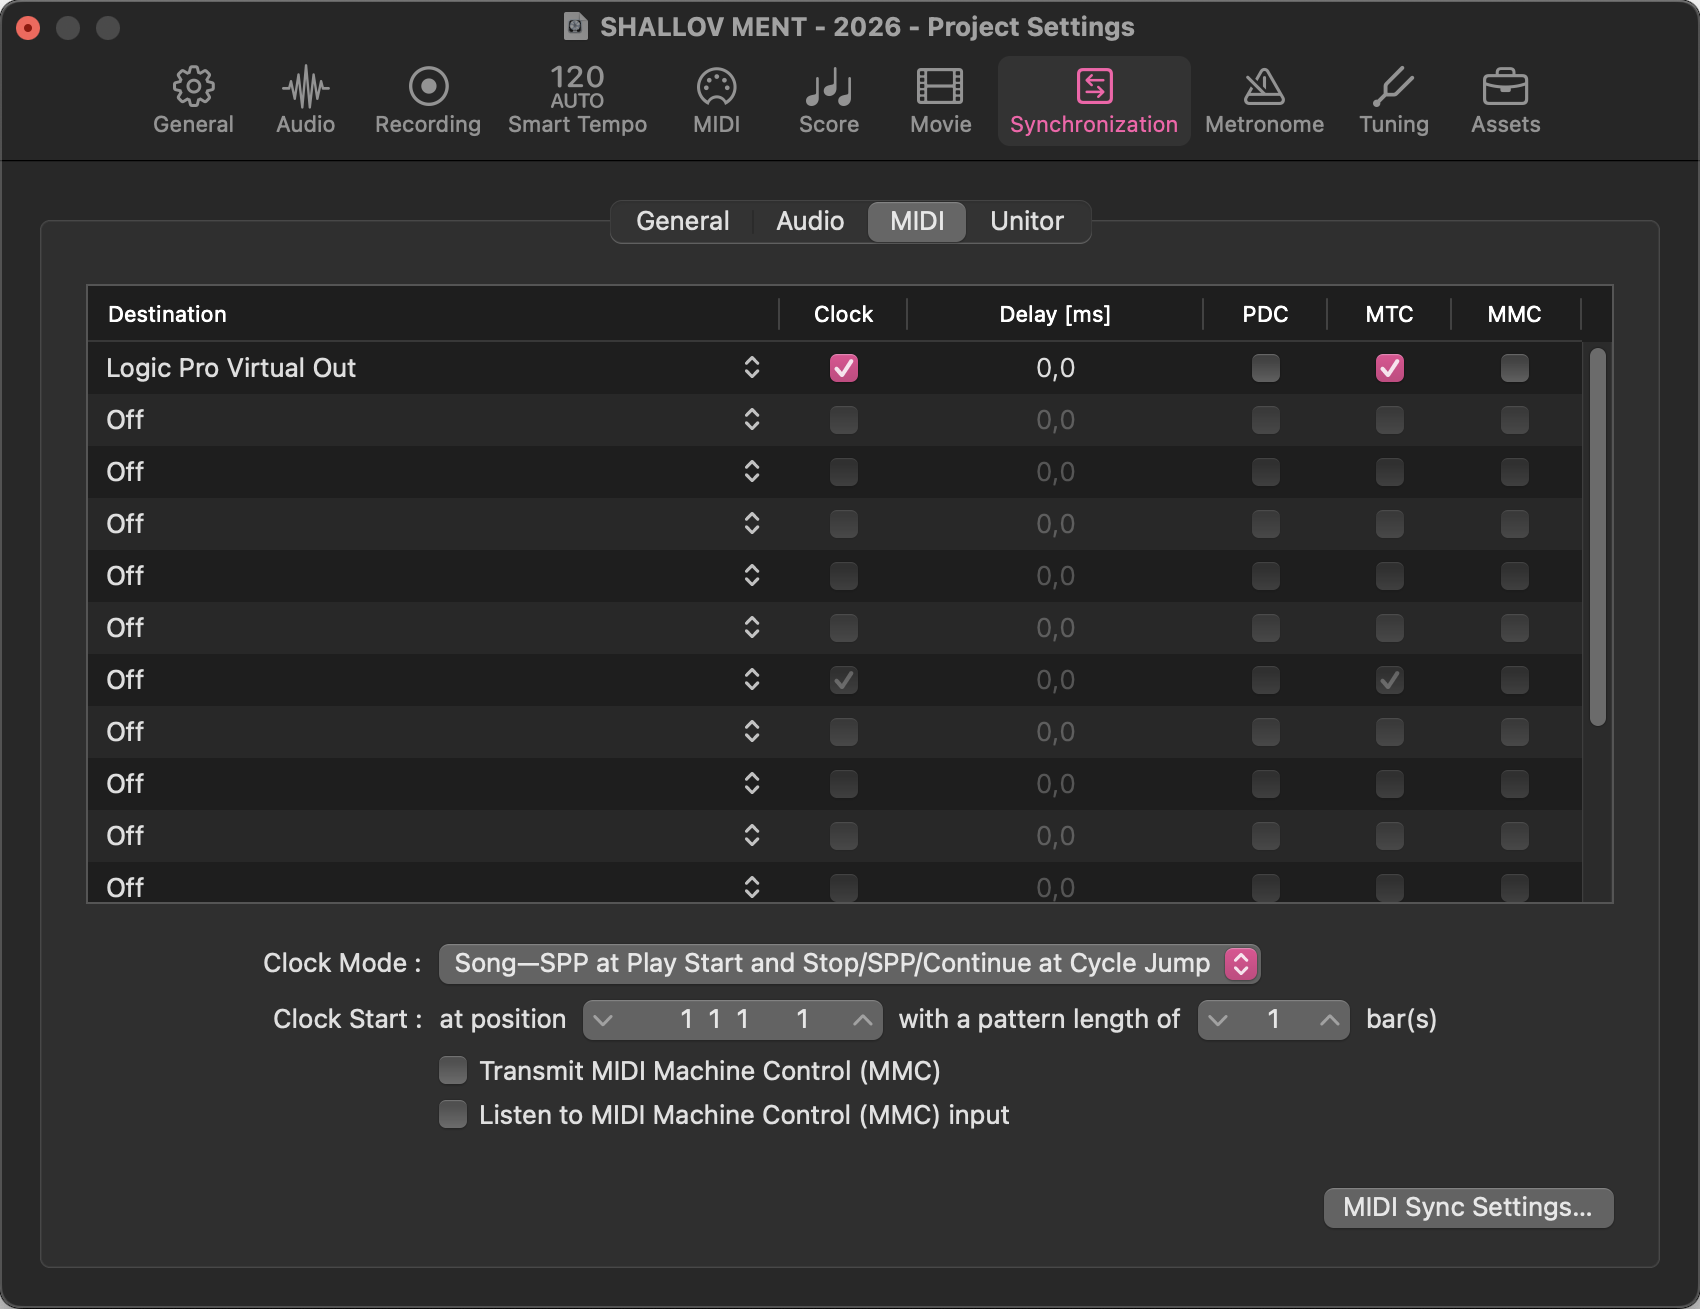
In Logic Pro open File ▸ Project Settings ▸ Synchronization ▸ MIDI. Set Destination to Logic Pro Virtual Out and turn on Clock and MTC under Transmit. This is a Project setting, so save the Project.
Verify the connection.
Open StageDAW’s Options ▸ Setup ▸ Connect to Logic Pro: with Logic running and playing, it reports Connected to Logic Pro and the MIDI lamp turns green — StageDAW is receiving timecode.
StageDAW communicates with Ableton Live through a small Control Script that runs inside Live. Install it once, choose it in Live’s settings, and StageDAW follows the playhead and jumps between your Locators.
Requires Ableton Live 10 or newer, on Mac or Windows.
Install the Control Script.
In StageDAW open Options ▸ Setup ▸ Connect to Ableton Live and press Install Script. StageDAW copies the script into Live’s Remote Scripts folder for you.
Start Ableton Live.
Live reads its Control Surface scripts when it starts, so start it now, or restart it if it was already open.
Choose StageDAW as a Control Surface in Live.
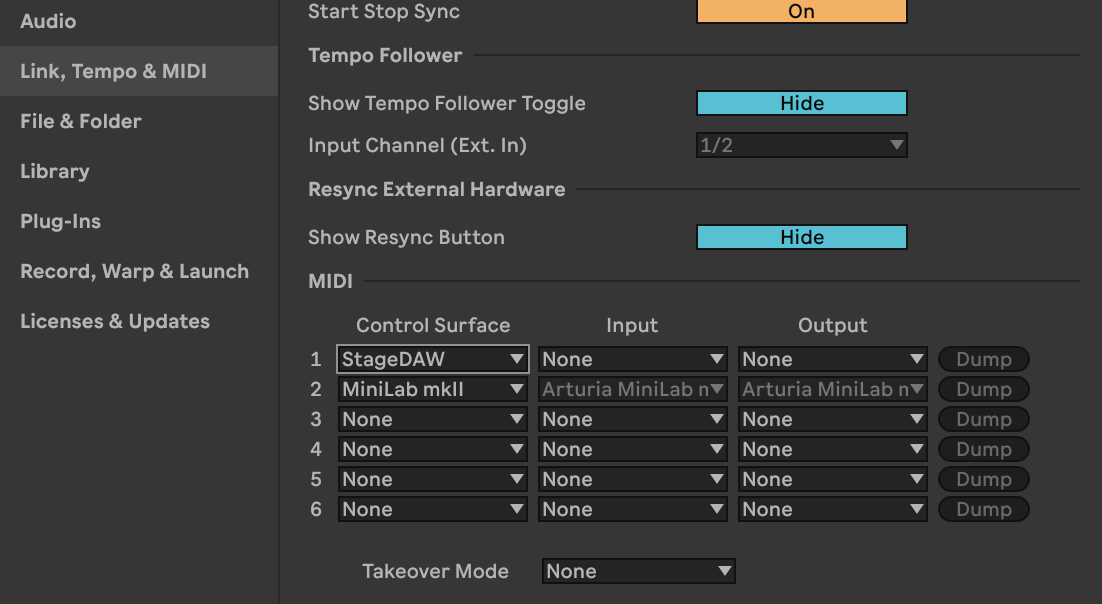
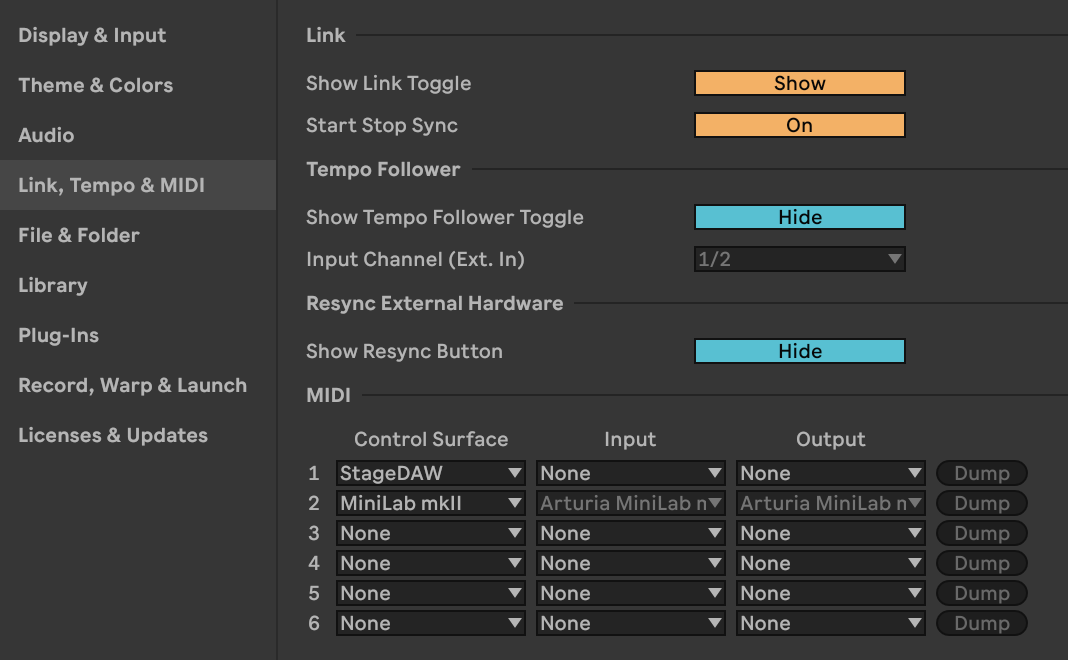
In Live open Settings ▸ Link, Tempo & MIDI (Preferences in Live 10 and 11) and set any free Control Surface slot to StageDAW. Leave Input and Output set to None — the Control Script doesn’t use MIDI ports.
Verify the connection.
Back in StageDAW’s Connect to Ableton Live window press OK: it reports the connection and the LINK lamp turns green.
StageDAW communicates with REAPER over two channels: a small Publisher Script that runs inside REAPER, and REAPER’s own OSC control surface. StageDAW installs both for you.
Requires REAPER 7.74 or newer, on Mac or Windows.
Quit REAPER.
REAPER loads its startup scripts and control surfaces only when it starts, so the installation happens with REAPER closed.
Install the script and the OSC Control Surface.
In StageDAW open Options ▸ Setup ▸ Connect to REAPER. Press Install Script — the Publisher Script goes into REAPER’s Scripts folder and is set to run at startup.
Then press Add to REAPER — the OSC control surface is written into REAPER’s settings.
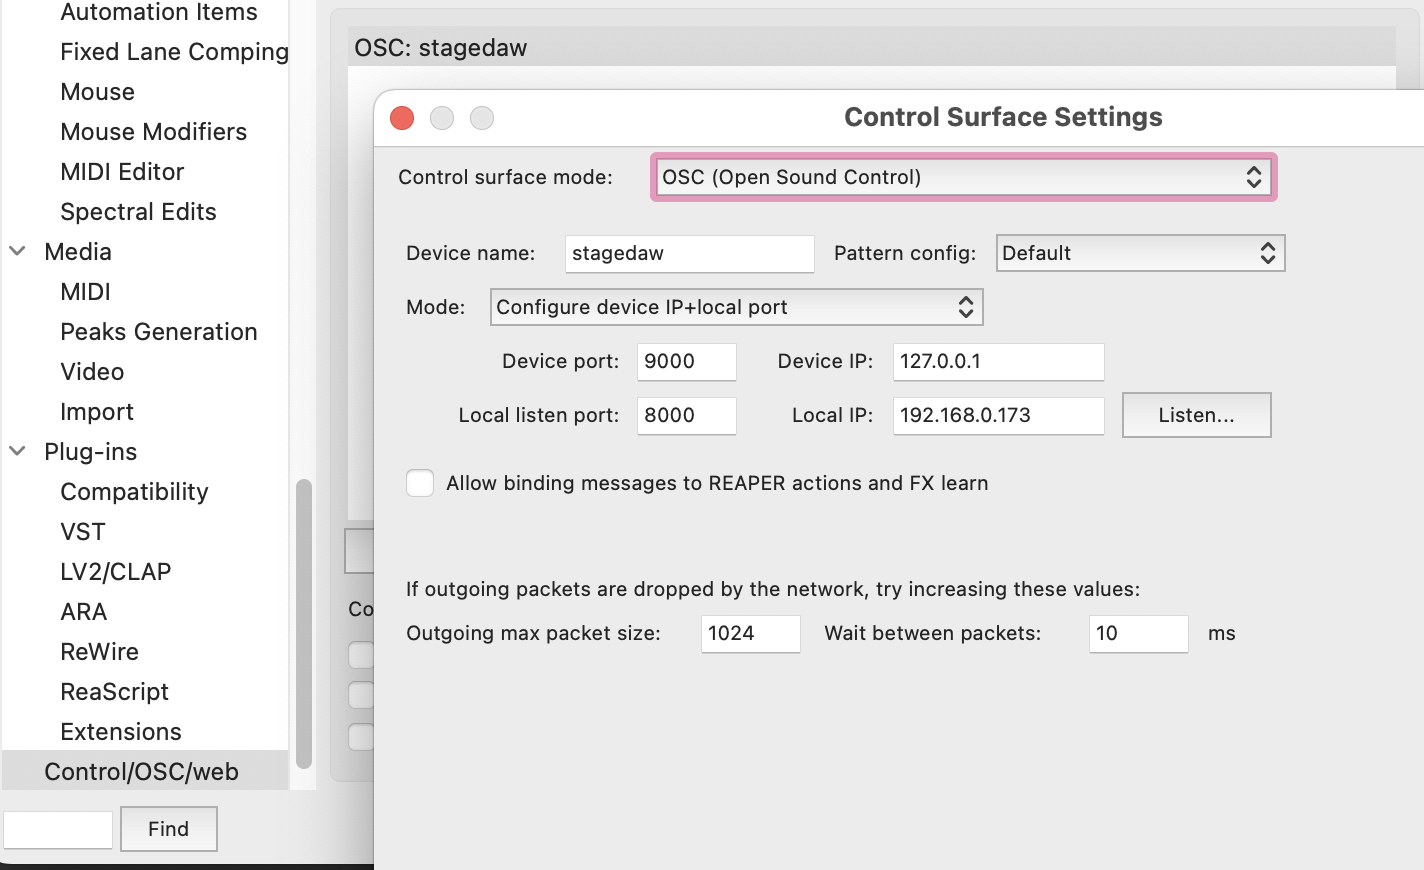
If you would rather add the control surface yourself: in REAPER open Preferences ▸ Control/OSC/web ▸ Add ▸ OSC and enter — Mode: Configure device IP+local port · Device IP: 127.0.0.1 · Device port: 9000 · Local listen port: 8000 · Pattern config: Default.
Start REAPER.
Open your project.
Verify the connection.
Back in StageDAW’s Connect to REAPER window press OK: it reports the connection and the LINK lamp turns green. Press Scan to read your Markers and Regions into the Setlist, then double-click a Song: REAPER jumps there.
Two Lives keep time together with Ableton Link, built into Live: the beat and Play/Stop are shared, the Song is not — StageDAW handles that. Set both up once; SWITCH changes which one leads.
Requires Ableton Live 10 or newer on both computers, on the same network. A wired connection is the most reliable; Wi-Fi is supported.
Open the Link settings on both computers.
Open Live’s Settings (Preferences in Live 10 and 11) ▸ Link, Tempo & MIDI (called Link MIDI in Live 10). Set Show Link Toggle to Show and turn Start Stop Sync on.
Turn on Link.
Click the Link button at the top left of Live’s window, on both. Each shows “1 Link” once they have found each other.

Verify that Link is connected.
Press Play in one Live — the other starts too. Stop it.
Set up StageDAW on both computers.
Open the same Show on both. Options ▸ Setup ▸ Redundant Playback ▸ Enable Redundant Playback, on both.
Pair the two computers.
On the computer that leads, press Pair and Sync next to the other computer’s name. Its Show is sent across; the other StageDAW shows Listen Only is on and a SWITCH button beside the PAIR lamp.
Run the Show from the leading computer.
StageDAW cues both Lives to the same locator; Link starts and stops them together. To lead from the other computer, press SWITCH there.
REAPER can follow another REAPER’s MIDI clock. The clock travels over your network as MIDI: each computer sends it, and the one that follows listens. Set both computers up once, so either can follow the other; StageDAW then changes which one follows when you press SWITCH.
Requires REAPER 7.74 or newer on both computers, on the same network. A wired connection is the most reliable; Wi-Fi is supported.
Set up network MIDI on macOS.
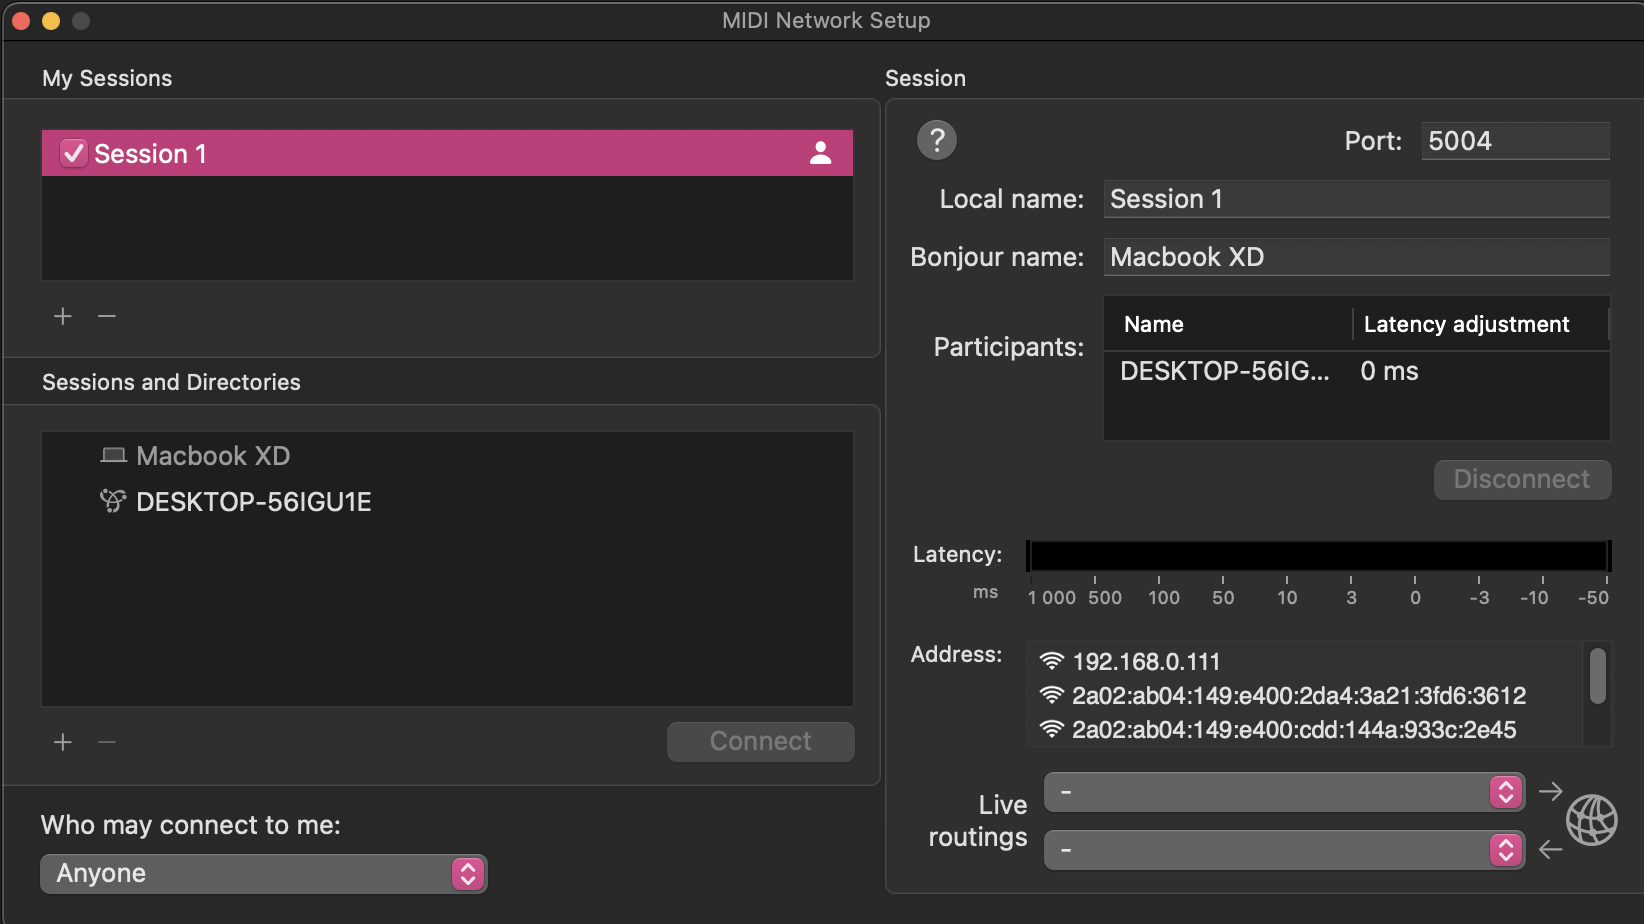
Open Audio MIDI Setup (press ⌘ Space and type its name). Window ▸ Show MIDI Studio, then MIDI Studio ▸ Open MIDI Network Setup.
Under My Sessions press + and tick the new session. Set Who may connect to me to Anyone. Leave Live routings empty.
Set up network MIDI on Windows.
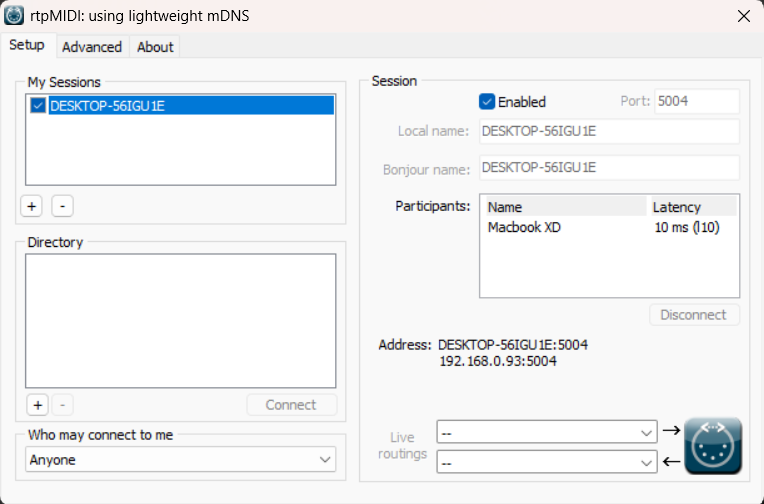
Install rtpMIDI (free, by Tobias Erichsen; Download here) and open it. Under My Sessions press +, tick Enabled. Under Directory select the Mac and press Connect. Connect from this side only — a session connected from both sides doubles every message.
Set up REAPER on each computer.
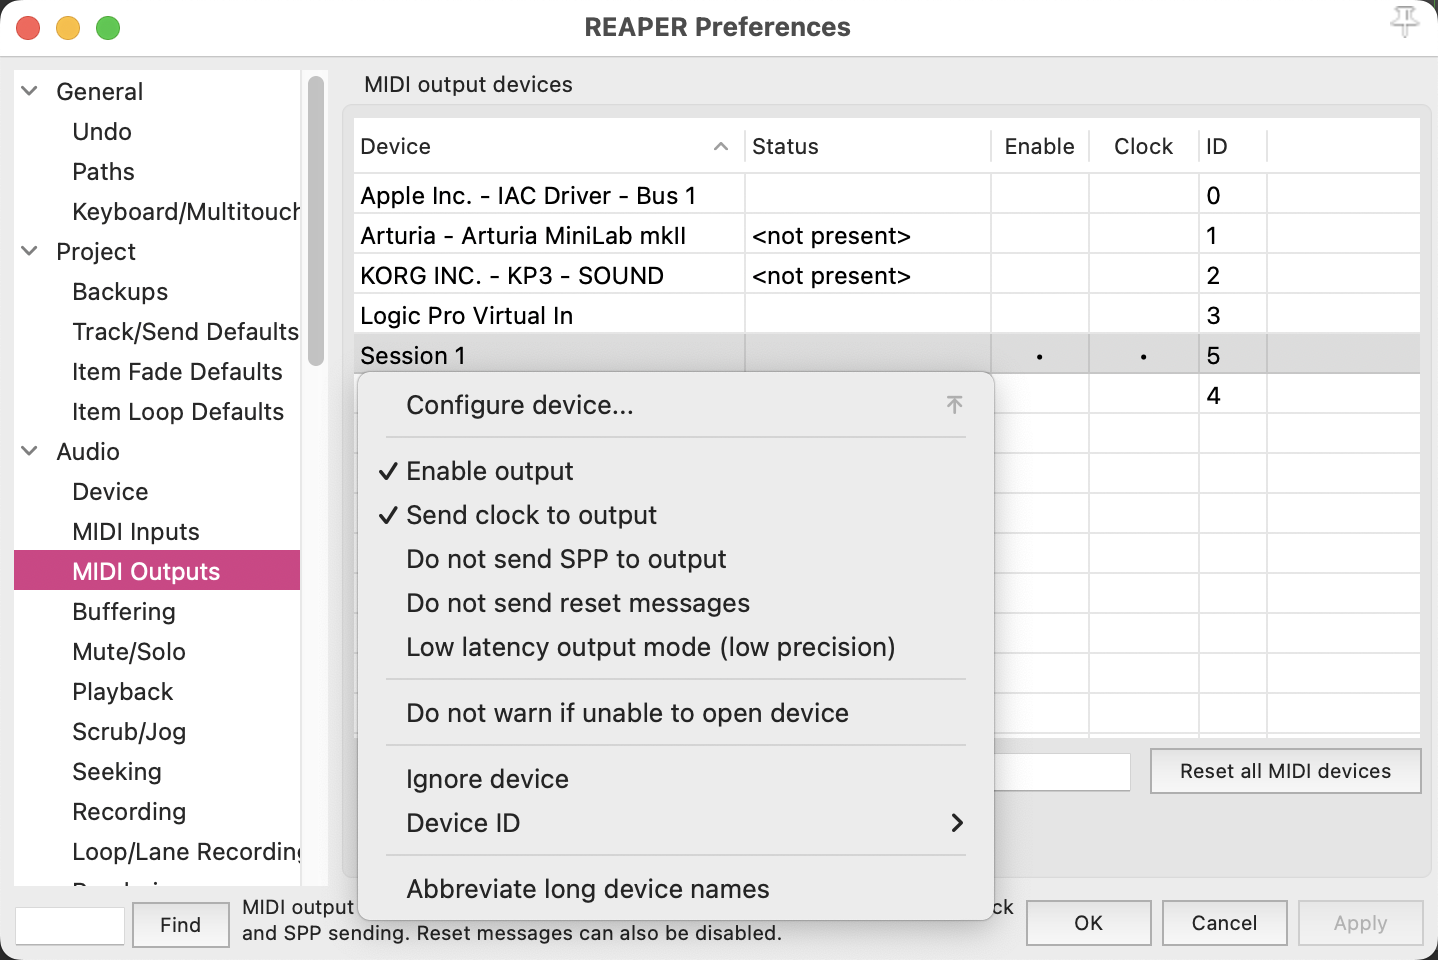
The same three settings on the Mac and on Windows; the session appears in REAPER under its name.
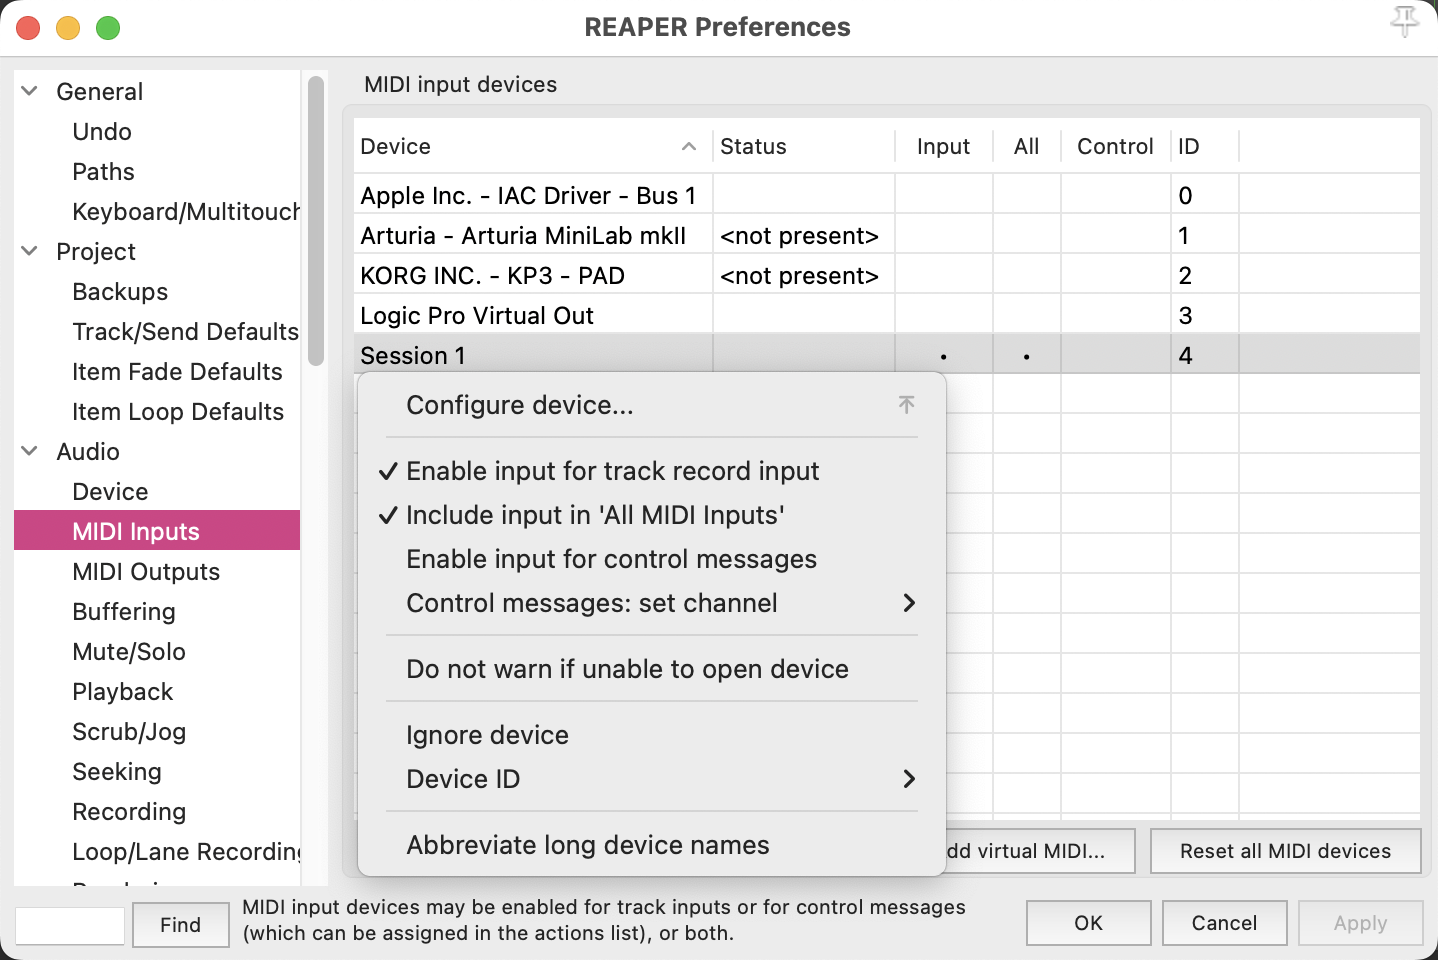
Options ▸ Preferences ▸ Audio ▸ MIDI Outputs: double-click the session, tick Enable output to this device and Send clock to this device, leave No SPP/continue unticked. Press OK.
MIDI Inputs: double-click the session, tick Enable input from this device. Leave Enable input for control messages unticked. Press OK, then Apply. If the session was just created, restart REAPER once so it lists the port.
Turn on timecode synchronization.
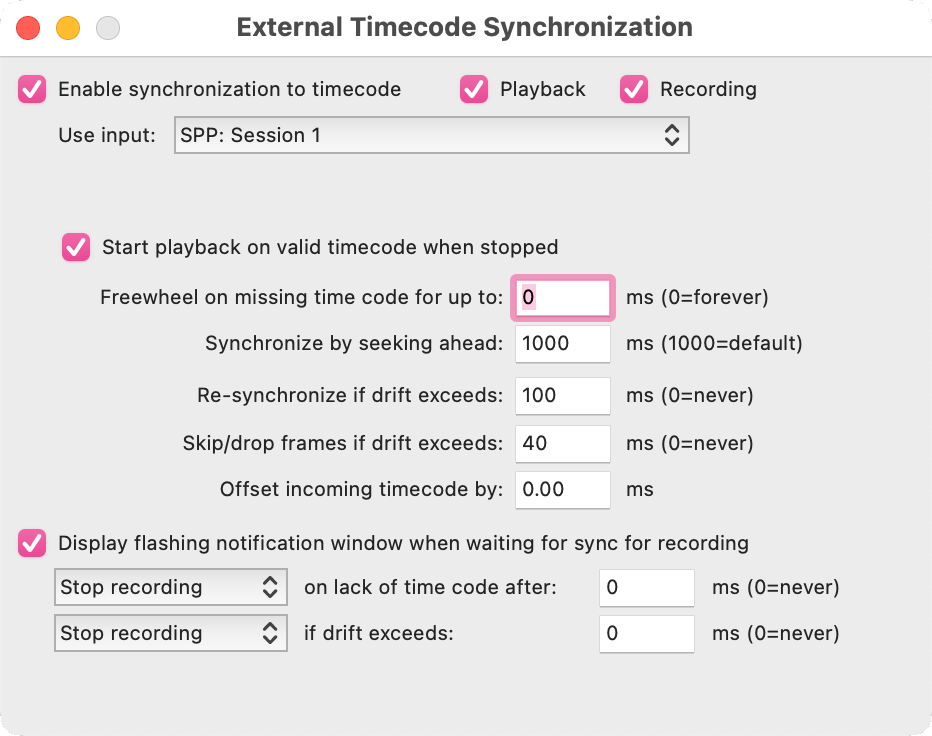
Right-click the Play button ▸ External Timecode Synchronization Settings: Use input = the session (not All Inputs), format SPP / MIDI Clock, tick Start playback on valid timecode when stopped, and set Freewheel on missing time code to 0 (forever) — so the follower keeps running on its own clock if the network drops, instead of stopping. Leave Enable synchronization to timecode unticked: StageDAW ticks it on the computer that follows.
Verify synchronization.
On one REAPER, right-click Play and tick Enable synchronization to timecode; its Play button shows sync. Press Play on the other REAPER: the first one starts too, at the same position. Stop, jump to a Marker, play again — it follows. Untick the box again. Both projects must have the same tempo: MIDI clock counts beats.
Set up StageDAW.
Open the same Show on both computers. Options ▸ Setup ▸ Redundant Playback ▸ Enable Redundant Playback, on both. On the computer that leads, press Pair and Sync next to the other computer’s name. Its Show is sent across; the other StageDAW shows Listen Only is on and a SWITCH button beside the PAIR lamp, and ticks synchronization to timecode in its REAPER by itself.
Run the Show from the leading computer. To lead from the other one, press SWITCH there: StageDAW swaps the roles and the tick in both REAPERs.
